Chinese Flat Knot is a great knot to use for jewelry such as bracelets or necklaces, It looks almost like a knit or weaved pattern when the knot is repeated on the same string, rope or twine over and over again.
Sunday, May 22, 2011

Sunday, March 27, 2011


Sunday, March 20, 2011
How to tie a Pan Chang knot
Pan Chang knot, also known as the mystic knot, is considered one of the eight Buddhist treasures. Its endless pattern represents the cyclical nature of all existence, symbolizing birth and death while indicating that life can exist forever- one of the basic beliefs of Buddhism. This intricate design is also used to represent the mysteries of the universe, and it is thought to bring good fortune to the wearer as well as those who view it.
You will need 2mm satin cord at least 4 feet long.
Instructions:
Step 1: Make a bight in the middle of the rope.
Step 2: Drop two opposing bights beside the middle bight.
Step 3: Hook the right running end down, then left under, over, under.
Step 4: The rope end over the vertical ropes. Then slither the running end back.
Step 5: The above rope end set forth, following the same path as the line above.
Step 6: Repeat above line three times.
Step 7: Now hook the left running end down, then right over all.
Step 8: The end over all the vertical ropes. Hook the running end back .
Step 9: The rope end back under the vertical ropes, then curve it around the bight below.
Step 10: The end rope passing over and under the vertical ropes again.
Step 11: Hook the running end up under, over-over-over, under, and over-over-over the ropes above it.
Step 12: Hook the running end down, under-under, over, under-under-under, over, and under the ropes below it.
Step 13: Curve the running end around the bight to the right and repeat Step 11.
Step 14: Curve the running end under the middle bight and repeat Step 12.
Steep 15: Rotate all the vertical and horizontal ropes 90 degrees, creating an upper and lower lattice of woven ropes.
Step 16: Carefully adjust the knot, taking up slack in consideration of the fact that the Pan Chang Knot has an upper and lower section.
Step 17: Congratulations! You've just finished the knot.
Step 18: The Pan Chang Knot is effectively a compressed cylinder and is not meant to lay completely flat.


Thursday, March 10, 2011


Saturday, March 5, 2011
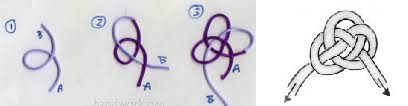
Tie a cloverleaf knot for St. Patrick's Day

This knot resembles a three-leaf clover and is a symbol of good luck. It's the perfect symbol for St. Patrick's Day. This knot combined with the double knot can easily form a decoration cloverleaf knot keychain.
You will need at least 12 inches length of 2mm satin cord.
Step 1. Form the letter M with the string and hold in place with pins. (See picture below)
Step 2. Take the right bend in the “M” and tuck it under the left leg of “M” and fasten with pin.
Step 3. Take right strand again and make a figure 8 loop the top one goes into the loop just formed in the previous step. Fasten again with pin. Also fasten the other part of the 8 with pin.
Step 4. Take the left strand slip it through the first figure 8 loop.
Step 5. Take right strand again and thread through original bottom loop from the bottom.
Step 6. Finally take the same strand double back and bring it through the top loop again from the bottom.
Step 7. Tighten string to form the knot. 
You can also learn more on how to tie different knots from these books:


Sunday, February 27, 2011
How to tie a simple double coin knot
The Double Coin Knot, also called Josephine knot, looks like two overlapping traditional styled Chinese coins which are round with a square hole in the center. This decorative knot has many applications. It can be tied with different colored threads to make attractive patterns or tied with double strands to add to its beauty. But it is not a tight knot. Step 1 Take thread, fold a loop with right strand (end A).
Step 2. Fold left strand over right loop and down the strand (end A).
Step 3. Weave the right strand (end B) over, under, over and under four strands. Then adjust strands and the knot is complete.
Wednesday, February 23, 2011
How to tie a double connection knot
Double connection knot is very useful for the beginning or end of any macrame knots to form elaborate design. The knot forms an X shaped figure when complete. Its primary purpose is to make a stable loop that does not loosen easily. The more you pull, the tighter it becomes.You will need at least 8 inches of 2 mm satin cord to practice this knot.
Step 1: Take satin cord, fold in half and fasten the midpoint with a pin. (See picture below)
Step 2: Take the strand and slip under the left strand, flip it up and then bring it done to form a loop.
Step 3: Take the left strand and tuck under the right strand then swing over toward the left and up.
Step 4: Take the same strand and tuck under lower loop of the knot and pull down.
Step 5: Pull both ends and the folded point at the top with equal force.

Sunday, February 20, 2011
How to tie a button knot
In order to tie a button knot, you need at least 12 inches rope. Usually the thicker rope the easier to control at the beginning.

 Step 1: Make a loop like the picture on the right.
Step 2: Make another loop over the top of the first loop. (The darker color represents the previous step).
Step 3: Take the end down through the loop on the right, up through the middle, and down through the left loop. Notice the little center area (highlighted). This will be important later. Take the end across the top of the fixed end.
Step 4. Take the end down through the right loop, under two ropes and up through the center area (highlighted in the previous pircure ).
Step 5: Gently and slowly pull the ends of the cord apart. You should see the shape of the knot beginning to form.
Step 6: Pull the knot until it begins to tighten. There will be a loop or two sticking out.
Step 7: Turn the knot around and tighten the loops one at a time until the loops are snug and the knot is tight.


 Step 1: Make a loop like the picture on the right.
 Step 2: Make another loop over the top of the first loop. (The darker color represents the previous step).
Step 3: Take the end down through the loop on the right, up through the middle, and down through the left loop. Notice the little center area (highlighted). This will be important later. Take the end across the top of the fixed end.
Step 4. Take the end down through the right loop, under two ropes and up through the center area (highlighted in the previous pircure ).
Step 5: Gently and slowly pull the ends of the cord apart. You should see the shape of the knot beginning to form.
Step 6: Pull the knot until it begins to tighten. There will be a loop or two sticking out.
Step 7: Turn the knot around and tighten the loops one at a time until the loops are snug and the knot is tight.
Wednesday, February 16, 2011
Basic material for knotting
Before you start to tie a knot, you need rope. Usually I use satin cord 2mm or 3mm for larger are work such as necklace or decoration on the keychain. 1mm silk or nylon rope would be good for bracelet or other smaller piece. There are other ropes you can use depending on the craft work you want to make, such as camping ropes are good for making survival bracelets. The general rule is the thinner the rope the tighter and smaller the knot is.  You will want to have some beads, such as wood, stone or metal. It depends on what size of rope you are using, usually you will want to have larger size hole in the beads, so you can put your ropes through the beads.
 Other useful tools you may want are cardboard at least 1 inch thick, so you can put pins to locate the ropes when you tie knots. You will also need scissors, needle pliers, glue.
Next I will teach you how to tie basic knots, check back for update.

Saturday, February 12, 2011
The beauty of knotting
 Knotting is a ancient art of weaving. For thousands of years, knot has been used to decorate beauty and demonstrate beauty. Knots decoration have been used to convey affection, consolidate friendship and express love. The art of knotting shows the longing and pursuit for a happy life.
 With different knots combine together, we can make different decorations. Here are some examples.


Subscribe to:
Posts (Atom)